Linux shell(6)-控制脚本

1. 处理信号

1.1 Linux 信号

  • Linux系统和应用程序可以生成超过30个信号,下表列出了常用的信号
信号 描述
1 SIGHUP 挂起进程
2 SIGINT 终止进程
3 SIGQUIT 停止进程
9 SIGKILL 无条件终止进程
15 SIGTERM 尽可能终止进程
17 SIGTOP 无条件停止进程,但不是终止进程
18 SIGSTP 停止或暂停进程,但不终止进程
19 SIGCONT 继续运行停止的进程

1.2 生成信号

1.2.1 中断进程

  • Ctrl+C组合键会生成SIGINT信号,在超时前按下Ctrl+C组合键,就可以提前终 止sleep命令。

1.2.2 暂停命令

  • Ctrl+Z组合键会生成一个SIGTSTP信号,停止shell中运行的任何进程。

停止(stopping)进程跟终止(terminating)进程不同:停止进程会让程序继续保留在内存中,并能从上次停止的位置 继续运行。

  • 当用Ctrl+Z组合键时,shell会通知你进程已经被停止了。
1
2
3
4
$ sleep 100
^Z
[1]+ Stopped sleep 100
$
  • 方括号中的数字是shell分配的作业号(job number)。shell将shell中运行的每个进程称为作业

  • 可以用ps命令来查看已停止的作业。

1
2
3
4
5
6
7
8
9
10
$ sleep 100
^Z
[1]+ Stopped sleep 100
$
$ ps -l
F S UID PID PPID C PRI NI ADDR SZ WCHAN TTY TIME CMD
0 S 501 2431 2430 0 80 0 - 27118 wait pts/0 00:00:00 bash
0 T 501 2456 2431 0 80 0 - 25227 signal pts/0 00:00:00 sleep
0 R 501 2458 2431 0 80 0 - 27034 - pts/0 00:00:00 ps
$
  • 在S列中(进程状态),ps命令将已停止作业的状态为显示为T。

1.3 捕获信号

  • 如果脚本收到了trap命令中列出的信号,该信号不再 由shell处理,而是交由本地处理, 格式如下:
1
trap commands signals
  • 每次使用Ctrl+C组合键,脚本都会执行trap命令中指定的echo语句,而不是处理该信号并 允许shell停止该脚本。
  • 案例:
1
2
3
4
5
6
7
8
9
10
11
12
13
14
15
16
17
18
19
20
21
22
23
24
25
26
27
28
29
30
31
32
33
34
35
$ cat test1.sh
#!/bin/bash
# Testing signal trapping
#
trap "echo ' Sorry! I have trapped Ctrl-C'" SIGINT
#
echo This is a test script
#
count=1
while [ $count -le 10 ]
do
echo "Loop #$count"
sleep 1
count=$[ $count + 1 ]
done
#
echo "This is the end of the test script"

===========================================
$ ./test1.sh
This is a test script
Loop #1
Loop #2
Loop #3
Loop #4
Loop #5
^C Sorry! I have trapped Ctrl-C
Loop #6
Loop #7
Loop #8
^C Sorry! I have trapped Ctrl-C
Loop #9
Loop #10
This is the end of the test script
$

1.4 捕获脚本退出

  • 要捕获shell脚本的退出,只要在trap命令后加上EXIT信号就行。
  • 案例:
1
2
3
4
5
6
7
8
9
10
11
12
13
14
15
16
17
18
19
20
21
22
23
$ cat test2.sh
#!/bin/bash
# Trapping the script exit
#
trap "echo Goodbye..." EXIT
#
count=1
while [ $count -le 5 ]
do
echo "Loop #$count"
sleep 1
count=$[ $count + 1 ]
done
#
$
$ ./test2.sh
Loop #1
Loop #2
Loop #3
Loop #4
Loop #5
Goodbye...
$

1.5 修改或移除捕获

1.5.1 修改

  • 要想在脚本中的不同位置进行不同的捕获处理,只需重新使用带有新选项的trap命令

  • 案例:

1
2
3
4
5
6
7
8
9
10
11
12
13
14
15
16
17
18
19
20
21
22
23
24
25
26
27
28
29
30
31
32
33
34
35
36
37
38
39
$ cat test3.sh
#!/bin/bash
# Modifying a set trap
#
trap "echo ' Sorry... Ctrl-C is trapped.'" SIGINT
#
count=1
while [ $count -le 5 ]
do
echo "Loop #$count"
sleep 1
count=$[ $count + 1 ]
done
#
trap "echo ' I modified the trap!'" SIGINT
#
count=1
while [ $count -le 5 ]
do
echo "Second Loop #$count"
sleep 1
count=$[ $count + 1 ]
done

=====================================================
$ ./test3.sh
Loop #1
Loop #2
Loop #3
^C Sorry... Ctrl-C is trapped.
Loop #4
Loop #5
Second Loop #1
Second Loop #2
^C I modified the trap!
Second Loop #3
Second Loop #4
Second Loop #5
$

1.5.2 移除

  • 也可以删除已设置好的捕获。只需要在trap命令与希望恢复默认行为的信号列表之间加上 两个破折号就行了。

  • 案例:

1
2
3
4
5
6
7
8
9
10
11
12
13
14
15
16
17
18
19
20
21
22
23
24
25
26
27
28
29
30
31
32
33
34
35
36
37
38
39
$ cat test3b.sh
#!/bin/bash
# Removing a set trap
#
trap "echo ' Sorry... Ctrl-C is trapped.'" SIGINT
#
count=1
while [ $count -le 5 ]
do
echo "Loop #$count"
sleep 1
count=$[ $count + 1 ]
done
#
# Remove the trap
trap -- SIGINT
echo "I just removed the trap"
#
count=1
while [ $count -le 5 ]
do
echo "Second Loop #$count"
sleep 1
count=$[ $count + 1 ]
done

==============================================
$ ./test3b.sh
Loop #1
Loop #2
Loop #3
Loop #4
Loop #5
I just removed the trap
Second Loop #1
Second Loop #2
Second Loop #3
^C
$

2. 后台模式运行脚本

2.1 后台运行脚本

  • 以后台模式运行shell脚本,只要在命令后加个&符就行了。

  • 案例:

1
2
3
4
5
6
7
8
9
10
11
12
13
14
15
$ cat test4.sh
#!/bin/bash
# Test running in the background
#
count=1
while [ $count -le 10 ]
do
sleep 1
count=$[ $count + 1 ]
done

=============================================
$ ./test4.sh &
[1] 3231
$
  • 结果的第一行是: [1] 3231 ,方括号中的数字是shell分配给后台进程的作业号。下一个数是Linux系统分配给进程的进程 ID(PID)。

  • 当后台进程结束时,它会在终端上显示出一条消息:

1
[1] 	Done 	./test4.sh 
  • 注意,当后台进程运行时,它仍然会使用终端显示器来显示STDOUT和STDERR消息。最好是将后台运行的脚本的STDOUT和STDERR进行重定向,避免这种杂乱的输出。

2.2 运行多个后台脚本

  • 按照后台运行脚本的方式,可以在命令行提示符下同时启动多个后台作业。
  • 如果终端会话退出,那么后台进程也会随之退出
1
2
3
4
5
6
7
8
9
$ ./test6.sh &
[1] 3568
$ This is Test Script #1
$ ./test7.sh &
[2] 3570
$ This is Test Script #2
$ ./test8.sh &
[3] 3573
$ And...another Test script

3. 在非控制台下运行脚本

  • 可以用nohup命令来实现在终端会话中启动shell脚本,然后让脚本一直以后台模式运行到结束,即使你退出了终端会话。

  • nohup命令的格式如下:

1
2
3
4
$ nohup ./test1.sh &
[1] 3856
$ nohup: ignoring input and appending output to 'nohup.out'
$
  • 为了保存该命令产生的输出,nohup命令会自动将STDOUT和STDERR的消息重定向到一个名为 nohup.out的文件中。

  • 当 运行位于同一个目录中的多个命令时一定要当心,因为所有的输出都会被发送到同一个 nohup.out文件中,结果会让人摸不清头脑。

4. 作业控制

4.1 查看作业

  • jobs命令允许查看shell当前正在处理的作业。
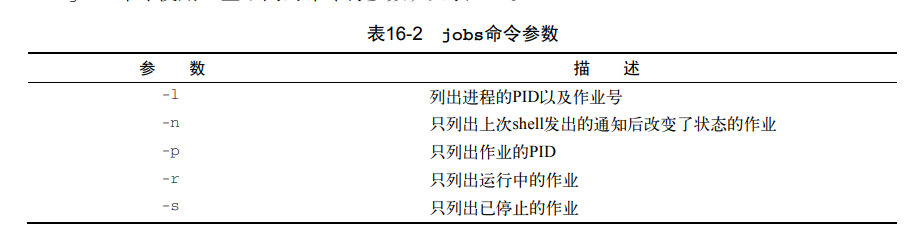
image-20220113103813013

1
2
3
4
$ jobs -l
[1]+ 1897 Stopped ./test10.sh
[2]- 1917 Running ./test10.sh > test10.out &
$
  • jobs命令输出中的加号和减号。

加号的作业会被当做默认作业。

带减号的作业成为下一个默认作业。

任何时候都只有一个带加号的作业和一个带减号的作业,不管shell中有多少个正在运行的作业。

4.2 重启停止的作业

4.2.1 后台模式

  • 后台模式重启一个作业,可用bg命令加上作业号
  • 当作业被转入后台模式时,并不会列出其PID。
  • 案例1:
1
2
3
4
5
6
7
8
9
10
$ ./test11.sh
^Z
[1]+ Stopped ./test11.sh
$
$ bg
[1]+ ./test11.sh &
$
$ jobs
[1]+ Running ./test11.sh &
$
  • 案例2:
1
2
3
4
5
6
7
8
9
10
11
12
13
14
$ ./test11.sh
^Z
[1]+ Stopped ./test11.sh
$
$ ./test12.sh
^Z
[2]+ Stopped ./test12.sh
$
$ bg 2
[2]+ ./test12.sh &
$
$ jobs
[1]+ Stopped ./test11.sh
[2]- Running ./test12.sh &
  • 在案例2中,命令bg 2用于将第二个作业置于后台模式。

4.2.2 前台模式

  • 前台模式重启作业,可用带有作业号的fg命令。
  • 前台进程会接管你当前工作的终端,所以在使用该功能时要小心
  • 由于作业是以前台模式运行的,直到该作业完成后,命令行界面的提示符才会出现

5 调整谦让度

  • 调度优先级(scheduling priority)是内核分配给进程的CPU时间(相对于其他进程
  • 调度优先级是个整数值,从 -20(最高优先级)到+19(最低优先级)。默认情况下,bash shell 以优先级0来启动所有进程。

5.1 nice 命令

  • nice命令允许你设置命令启动时的调度优先级。
  • 让命令以更低的优先级运行,只要用nice 的 -n 命令行来指定新的优先级级别
  • 案例:
1
2
3
4
5
6
7
$ nice -n 10 ./test4.sh > test4.out &
[1] 4973
$
$ ps -p 4973 -o pid,ppid,ni,cmd
PID PPID NI CMD
4973 4721 10 /bin/bash ./test4.sh
$
  • nice命令阻止普通系统用户来提高命令的优先级。

5.2 renice 命令

  • 是renice命令可以改变系统上已运行命令的优先级,它允许你指定 运行进程的PID来改变它的优先级
  • 案例:
1
2
3
4
5
6
7
8
9
10
11
12
13
14
$ ./test11.sh &
[1] 5055
$
$ ps -p 5055 -o pid,ppid,ni,cmd
PID PPID NI CMD
5055 4721 0 /bin/bash ./test11.sh
$
$ renice -n 10 -p 5055
5055: old priority 0, new priority 10
$
$ ps -p 5055 -o pid,ppid,ni,cmd
PID PPID NI CMD
5055 4721 10 /bin/bash ./test11.sh
$

5.3 注意

  • 和nice命令一样,renice命令也有一 些限制:

只能对属于你的进程执行renice;

只能通过renice降低进程的优先级;

root用户可以通过renice来任意调整进程的优先级。

  • 如果想完全控制运行进程,必须以root账户身份登录或使用sudo命令。

6. 定时运行作业

6.1 at 命令

  • at命令允许指定Linux系统何时运行脚本。

6.1.1 命令格式

  • 格式:
1
at   [-f filename]   time
  • time参数指定了Linux系统何时运行该作业。如果你指定的时间已经错过,at命令会在第二 天的那个时间运行指定的作业。

  • at命令能识别多种不同的时间格式。

  • 标准的小时和分钟格式,比如10:15。

  • AM/PM指示符,比如10:15 PM。

  • 特定可命名时间,比如now、noon、midnight或者teatime(4 PM)。 除了指定运行作业的时间,也可以通过不同的日期格式指定特定的日期。

  • 标准日期格式,比如MMDDYY、MM/DD/YY或DD.MM.YY。

  • 文本日期,比如Jul 4或Dec 25,加不加年份均可。

  • 你也可以指定时间增量。

  • 当前时间+25 min
  • 明天10:15 PM
  • 10:15+7天

6.1.2 获取作业的输出

  • 任何发到STDOUT或STDERR的输出都会通过邮件系统发送给该用户

  • at命令利用sendmail应用程序来发送邮件。如 果你的系统中没有安装sendmail,那就无法获得任何输出!

  • 因此在使用at命令时,最好在脚本 中对STDOUT和STDERR进行重定向

  • 如果不想在at命令中使用邮件或重定向,最好加上-M选项来屏蔽作业产生的输出信息

6.1.3 列出等待的作业

  • atq命令可以查看系统中有哪些作业在等待
  • 案例:
1
2
3
4
5
6
7
8
9
10
11
12
13
14
15
16
17
18
$ at -M -f test13b.sh teatime
job 17 at 2015-07-14 16:00
$
$ at -M -f test13b.sh tomorrow
job 18 at 2015-07-15 13:03
$
$ at -M -f test13b.sh 13:30
job 19 at 2015-07-14 13:30
$
$ at -M -f test13b.sh now
job 20 at 2015-07-14 13:03
$
$ atq
20 2015-07-14 13:03 = Christine
18 2015-07-15 13:03 a Christine
17 2015-07-14 16:00 a Christine
19 2015-07-14 13:30 a Christine
$

6.1.4 删除作业

  • 用atrm命令来删除等待中的作业。
  • 只要指定想要删除的作业号就行了。只能删除你提交的作业,不能删除其他人的
  • 案例:
1
2
3
4
5
6
7
8
9
10
11
$ atq
18 2015-07-15 13:03 a Christine
17 2015-07-14 16:00 a Christine
19 2015-07-14 13:30 a Christine
$
$ atrm 18
$
$ atq
17 2015-07-14 16:00 a Christine
19 2015-07-14 13:30 a Christine
$

6.2 定期执行脚本

  • 使用cron程序来安排要定期执行的作业
  • cron程序会在后台运行并检查一个特殊的表(被称作cron时间表),以获知已安排执行的作业

6.1.1 cron 时间表

  • 格式:
1
min hour dayofmonth month dayofweek command
  • cron时间表允许你用特定值、取值范围(比如1~5)或者是通配符星号)来指定条目。

min hour 每一天的 分 时

dayofmonth 每个月的某一天

dayofweek 每周的某一天

  • 在每天的10:15运行一个命令:
1
>15 10 * * * command
  • 在每个月每天的10:15 执行该命令:
1
>15 16 * * 1 command
  • 在每个月的第一天中午12点执行命:
1
>00 12 1 * * command
  • 如何设置一个在每个月的最后一天执行的命令?

常用的方法是加一条使用date命令的if-then语句来检查明天的日期是不是01:

1
>00 12 * * * if [`date +%d -d tomorrow` = 01 ] ; then ; command
  • 它会在每天中午12点来检查是不是当月的最后一天,如果是,cron将会运行该命令。
  • 命令列表必须指定要运行的命令或脚本的全路径名。你可以像在普通的命令行中那样,添加 任何想要的命令行参数和重定向符号。
1
15 10 * * * /home/rich/test4.sh > test4out 

6.1.2 构建cron时间表

  • Linux提供 了crontab命令来处理cron时间表,列出已有的cron时间表,可以用-l选项。
1
2
$ crontab -l
no crontab for rich
  • 默认情况下,用户的cron时间表文件并不存在。要为cron时间表添加条目,可以用-e选项。

6.1.3 cron目录

  • 用预配置的cron脚本有4个基本目录:hourly、daily、monthly和weekly。
  • 如果脚本需要每天运行一次,只要将脚本复制到daily目录,cron就会每天执行它。
1
2
3
4
5
6
7
8
9
$ ls /etc/cron.*ly
/etc/cron.daily:
cups makewhatis.cron prelink tmpwatch
logrotate mlocate.cron readahead.cron
/etc/cron.hourly:
0anacron
/etc/cron.monthly:
readahead-monthly.cron
/etc/cron.weekly:

6.1.4 anacron程序

  • 当系统开机时,cron程序不会再去运行那些错过的作业。要解决这个问题,许多Linux发行版还包含了anacron程序。

  • 如果anacron知道某个作业错过了执行时间,它会尽快运行该作业。这意味着如果Linux系统关机了几天,当它再次开机时,原定在关机期间运行的作业会自动运行。

  • 略过后面内容,如有需要,自行百度

参考文献

image-20220106145912775


Linux shell(6)-控制脚本
https://oldstory.cn/2022/01/13/linux_shell_6_kong_zhi_jiao_ben/
作者
Ricardo
发布于
2022年1月13日
许可协议